Chalk
Stick Making Machine

Gun Metal Chalk Mould with
Copper Pins on fibre glass plates
for ejection of chalk sticks
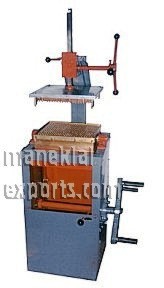 Model: CM-514 Chalk Stick Making Machine
|
Model:
|
CM-410
|
CM-514
|
CM-915
|
|
Chalk Diameter (Top / Bottom) (mm):
|
8 / 11
|
8 / 11
|
8 / 11
|
|
Chalk Length (mm):
|
75
|
75
|
75
|
|
Number of chalk sticks per operation:
|
406
|
514
|
911
|
|
Time taken for one operation (min.):
|
15
|
18
|
20
|
|
Overall Dimensions (m):
|
0.7 x 0.7 x 1.6
|
0.7 x 0.7 x 1.6
|
0.8 x 0.8 x 1.8
|
|
Net / Gross Weight (Kgs.):
|
150 / 250
|
175 / 275
|
250 / 400
|
|
Shipping Volume (m3
):
|
0.8
|
0.8
|
1.15
|
Standard Accessories: 2 G.I. Trays, 2
Knives, Rubber Sheet
Chalk Stick Making Machine
Seamless Taper Chalk Stick Making Machine
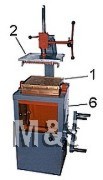
The machine has the following items:
1. One piece Gun-Metal body mould
2. Fiber sheet / Aluminium plate with Copper / Brass pins
3. G. I. Tray / boxes (two nos.)
4. Steel knives (two nos.)
5. One wooden base covered with Rexene cloth
6. Rack gear fitted steel fabricated stand with handles to hold Gun-metal mould & Aluminium plate
Other items required to start production (not supplied by us):
-
Jug
-
Pot / Vessel
-
Glass / Mug
-
Cotton Cloth
-
Kerosene
-
Mustard Oil
-
Plaster of Paris (raw material)
-
Water
Machine Operation:
-
First of all, clean the machine with Kerosene oil / Petrol to remove all the dust / grease / oil (except item no. 5 – wooden base – supplied with machine).
-
Apply fresh lubricant oil to the rack-gears & brackets, which hold the gun-metal mould.
-
Apply oil (mixture of Kerosene oil & Mustard oil in 50:50 ratio) at the upper portion of the mould (side having bigger diameter holes) with the help of a brush so that the oil goes down the entire mould.
-
Cover the wooden base with wet cotton cloth, 4–5 folds, and place it on the M.S. plate just below the gun-metal mould. Operate the lower handle of machine so that this wooden base with the wet cotton cloth touches/sticks to the lower part of the gun-metal mould (side where the hole diameter is smaller). Now lock the machine/handle with the lever provided near the handle. The wet cotton cloth at the base of the mould will prevent leakage of Plaster of Paris and will also soak the excess water from the mixture.
-
Now operate the upper handle of the machine and bring the aluminium plate with copper/brass pins to maximum upper limit to enable pouring of the mixture.
-
Preparing the Plaster of Paris Mix: Take a pot/vessel and pour some water in it. Add the Plaster of Paris to this water.
NOTE: Refrain from pouring water over Plaster of Paris as then the water will not mix well and evenly, resulting in lumps.
-
Stir the mixture thoroughly by hand or with a stick.
NOTE: Only mix enough quantity for one charge of the mould, as the mixture sets very fast. If not enough, and you top it up later, chalks may break.
-
Pour the mixture from the top of the gun-metal mould (side with larger diameter holes) and allow it to settle down.
-
After 4–5 minutes, remove the excess mixture from the top with the steel knife provided.
-
Remove the wooden base & cotton cloth from under the mould, and invert the mould using the lever so the side with larger diameter holes faces down.
-
Put the G.I. tray/box on the plate and touch it to the mould.
-
Bring down the aluminium plate with pins using the upper handle and apply light pressure. The pins will push the chalks out of the moulds and into the G.I. tray.
-
Take the aluminium plate with pins back up using the upper handle and remove the G.I. tray containing the chalk sticks.
-
Place the tray in the open under the sun to dry. You may also use an electric oven for quicker drying.
-
For the next batch, rotate the mould back to its original position (larger diameter holes up), lubricate with the 50:50 oil mixture, mix the next batch of Plaster of Paris & water, and continue from step 8.
Caution:
-
Do not pour
the mixture of Plaster of Paris & water into the mould without oiling
the mould with a 50:50 mixture of Kerosene & Mustard oil.
-
Always prepare just enough mixture of Plaster of Paris for one charge of
the mould.
-
Always keep wet cotton cloth with 4-5 folds at the bottom of the mould.
-
Daily Oil / Lubricate Rack-Gear & moving parts of the machine.
-
Use superior quality of Plaster of Paris as it will also give smooth
writing of chalk sticks.